Sunday 11 September 2011

Pork, Potatoes and Pie-rates!

Today my boyfriend has pretty much demanded that we have hot pork sandwiches for dinner - so I kindly obliged and he has been a very happy man!!

I popped it in to a cooking bag and it came out lovely!

I also made some potatoes with an aioli dip to go with it;

Aioli Dip


Ingredients;

1 slice of white bread with the crusts removed

2 tbsp champagne or white wine vinegar

6 large garlic cloves, chopped - depending on how much garlic you like you could use less

2 extra-large egg yolks

1/2 tsp grated lemon zest

3 tbsp freshly squeezed lemon juice

1/2 tsp saffron threads

salt

freshly ground black pepper

good olive oil (do NOT use extra virgin - it will taste completely wrong!!)


Tear the bread in to small pieces and soak it in the vinegar - set aside for 5 minutes.


In a food processor, blend the garlic, egg yolks, zest, juice, saffron, salt and pepper and add the bread after squeezing the excess vinegar out. Once it is blended, slowly pour in the olive oil until it reaches the consistency of thick sour cream/mayonnaise.

Serve with some wedges of potatoes - hot or cold.. cold with a sprinkling of salt is especially yummy!!
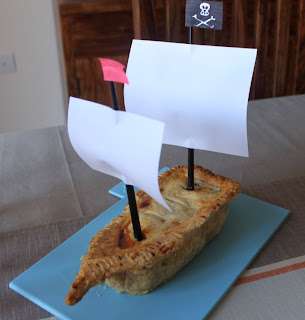

-------------------------------------------------------------

Now for the main part of the blog. After telling my Dad I was stumped for ideas for my cooking blog, he requested an apple pie. My Dad, along with the rest of my family, has learnt not to expect anything ordinary from me - so I didn't want to disappoint and decided I would make him and Apple Pie-rate Ship that I came across on Diamonds for Dessert!

Apple Pie-rate Ship


Ingredients;

For the pastry;

255g plain flour

pinch of salt

140g hard margarine or unsalted butter

6 tsp ice cold water

For the filling;


3/4 apples - I used a mixture of braeburn and granny smith but you can use whichever you like

6 tbsp sugar

3/4 tbsp flour

1/2 tsp cinnamon

1/4 tsp salt

a pinch of nutmeg


Sieve the flour and salt in to a bowl, then add the cubed butter. Rub together with your fingertips until they look like breadcrumbs (you need to make sure the butter doesn't melt so to make your hands extra cold run them under the cold water tap for a while!). Add the water a tsp at a time until you make a dough then chill in the fridge for 30 minutes.


Put all of the ingredients for the filling in a bowl and then you can either set them aside until you want to fill the pie if you want a bit of crunch or you can cook the apples for a short while if you want a softer texture.


How to make the pirate ship;


I used a foil tray and bent one of the shorter sides so it formed a ship, I then wrapped it in foil and added a bit of extra foil to the front in order to make the bow of the ship. Spray in a bit of nonstick spray when done.

Roll out your dough and then fill
the container - then prick with a fork all over. Put the left over dough back in to the fridge for later when you cover the pie.

Finally add some baking paper and fill with rice or dried beans and bake in the oven at 200 (Celsius) for 12-15 minutes.


Leave the crust to cool and then add the filling - roll out the rest of the dough and add to the top - slice some lines in to the top of the pie and using a fork press it around the crust edge to join the dough together. Whisk an egg and a bit of milk together and brush over the dough - then sprinkle a little sugar over the top.

Bake in the oven for 20-30 minutes at 200 (Celsius) - I then added some chopsticks that I had added some flags to with a little bit of blu-tack.

Serve warm with lashings of custard or cold vanilla ice cream.


Enjoy me hearties!!

Saturday 10 September 2011

Nibbles and Naughties!!

So today I decided to try out some savoury bites - over the course of next week I have quite a few people popping round to see the new house, so I thought it would be nice to have some homemade nibbles to have with a glass of wine; so this is what I made!

Thyme and Cheddar Bites


Ingredients;

50g butter

115g strong cheddar cheese

1 tsp english mustard powder

pinch of salt

100g pl
ain flour
1 tsp dried thyme or
2tbsp fresh thyme (chopped)


Blend the butter and cheese together in a bowl - ideally the butter will be soft. Add everything else and mix together until it forms a dough. Roll the dough in to a thinnish log, wrap in cling film and leave to chill in the fridge for 30 minutes at least.

Preheat the oven to 180 (Celsius) and line 2 baking sheets.

Unwrap the dough and slice in to pieces, place on the baking sheets and
bake for about 10 minutes until golden - leave to cool and then pour yourself a nice cold drink (preferably alcoholic!) to enjoy with.

Pretty Parmesan Biscuits

I've called these pretty because I've used a flower cutter to cut them out - but you can use whichever shape you like!


Ingredien
ts;

150g plain flour

110g grated parmesan cheese

1 tsp baking powder

pinch of salt

pinch of paprika

75g butter, cubed

2 large free-range egg yolks


Mix all of the dry ingredients together in a large bowl and then add
the butter and rub it together with your fingertips until the mixture looks like breadcrumbs. Add the egg yolk and form the dough in to a ball - wrap it in cling film and pop it in to the fridge for about 30 minutes.


Pre-heat the oven to 200 (Celsius) and line two baking trays.

Unwrap the dough and roll it out on to a lightly floured surface then cut out small shapes and pop them on to the baking tray to bake for around 8-10 minutes until golden. Leave to cool.

By now the kitchen will be smelling heavenly!


Finally, we come to the naughty part! My sweet tooth could not resist temptation today, so I baked some chocolate and vanilla cookie sandwiches!

Chocolate and Vanilla Cookie Sandwiches

Ingredients;


For the cookies;

150g plain flour
90g cocoa powder (not hot chocolate powder, this won't do!!)
1 tsp soda

1/4 tsp baking powder

340g golden caster sugar

150g unsalted butter
1 large egg


For the vanilla cream filling;


50g butter

50g vegetable shortening (I used trex)

80g (ish) of icing sugar

1/2 tbsp of good vanilla extract


Pre-heat the oven to 190 (Celsius).

In a bowl, sieve together the flour, cocoa, baking soda, baking powder and salt.

In another bowl, cream together the sugar and butter until light and fluffy. Add the egg and combine. Add the dry mixture and fold in until the dough is well combined.

Depending on how big you want the cookies, you can use either a teaspoon or an ice cream scoop to put the mixture on to lined baking trays about 2 inches apart. Using a glass (rinse it with some water first) dipped in caster sugar, flatten the balls of dough - you may need a spatula to help remove the glass from the mixture.

Bake for about 10-12 minutes and leave to cool.

Whilst the cookies are cooling cream the butter and shortening together, then add the icing sugar and vanilla extract - use the filling to sandwich together two similar sized cookies and enjoy with a cold glass of milk!

I have no idea how many calories are in these bad boys - and you probably wouldn't want to know.. just devour them before you have time to feel guilty!

Sunday 4 September 2011

The First Sunday Roast...

So today I cooked the first Sunday roast I've made in the new house, and my parents came over to sample the delights.

Today has been really quite warm - the weather's been a bit odd lately and I'd pretty much accepted that we were officially moving in to Autumn/Winter so I hadn't planned on making such a summery roast.

I opted for a chicken roast and decided to stuff the bird as it has been a lovely warm day today - I mixed together some butter, fresh parsley, marjoram, thyme, salt and pepper in a bowl and then lifted the skin of the chicken to rub the mixture in to.

I then cut a lemon in to quarters, tore up four bay leaves and added a sprig of rosemary into the cavity. I drizzled some olive oil over the chicken and then added some salt and pepper - then left it to
roast at 220 (Celsius) for about an hour and a half.


Next was time to tackle the carrots. In the run up to Christmas, my
mom and I always try out different recipes for carrots to ensure we have the perfect tasting ones in time for our Christmas dinner - we have definitely nailed the perfect Christmas carrot and I will share the secret with you in a later post! Today though, as the weather was so sunny it seemed wrong to put such a 'warming' vegetable with this roast, so I opted for this Ina Garten recipe.

I boiled the carrots and then transferred them to a glass dish and added;

1 teaspoon grated orange zest
1 teaspoon freshly squeezed orange juice
Squeeze of honey

1/2 teaspoon of ground ginger (you can add more or less depending on how much you like ginger)
Salt
Pepper
A knob of butter

I then left them to roast in the oven alongside my yummy roast potatoes that I popped under the chicken to roast in the fat, and also added a little goose fat to help crisp them up further - I boiled them a little first before popping them in the oven for about 45 minutes.


Finally I opted for some roasted nectarines for dessert, my Mom has wanted to try some for ages so I thought this would be a nice end to a summery roast - except for my Dad, he settled for trifle!!

Halve the nectarines and remove the stone. Crush up some ginger biscuits and add the crumbs to some melted butter and a blob of honey then spoon the mixture in to the nectarines and sprinkle with a little brown sugar. Pop them flesh side down in a roasting tray and pour over a little freshly squeezed orange juice.

Roast in the oven for about 20 minutes at 190 (Celsius).

Whilst the nectarines are roasting, mix together a few tablespoons of Philadelphia with two tablespoons of caster sugar and a little orange zest.

Enjoy! Tyler did!


Saturday 3 September 2011

Totoro Icebox Cookies

Since I was a little girl I have always been obsessed with Totoro - so I thought what could be cuter and yummier than a whole batch of Totoro biscuits?!

I took the idea from Diamonds for Dessert (check out her blog - she's amazing!) as she made the sweetest looking animal icebox cookies - so I decided to try out some Totoro ones.

Ingredients;


300g plain flour

240g unsalted butter at room temperature

170g caster sugar

50g icing sugar

2 egg yolks

Few drops of good vanilla extract

Black food colouring


Firstly, cream the butter and all of the sugar in a bowl - then add the two egg yolks and the vanilla extract. Add the flour and mix together (probably best with your hands) until it forms a dough.

Split the dough in to half and to one half of the mixture add a few drops of black food colouring - kneading well until you reach the grey colour you desire.

Next, roll out the plain dough in to a sausage shape (awful diagram 1)


Then, take the grey dough and roll it out so it is the same length as the sausage shaped dough (awful diagram 2)


You then need to roll the grey dough out from the sides so you have a small bump in the middle which will become Totoro's head (see awful diagram 3)


Once this is done, wrap the grey dough around the sausage shaped dough and you should end up with something that looks like awful diagram 4! (Keep a small amount of the dough aside to add on some ears to your totoro)


Wrap the dough in some cling film and leave it to chill in the fridge for about 15-20 minutes.

Once it has chilled, cut it in to slices using a sharp knife and lay the slices on to a greaseproof covered oven tray - add two pointy ears to your totoro's and then leave the cookies to chill in the fridge for about 10 minutes.


Once they are chilled, place them in to a preheated oven of 170 (celsius) and cook for about 12-14 minutes.

Leav
e the cookies to cool on a wire rack and then the fun part begins - decorating!!

Mix up some white icing, and make a batch of black icing using the food colouring - I used a skewer to add the detail to the biscuits.

You'll be left with some adorable cookies that, if you can bear to eat something so beautiful, taste beyond amazing! Enjoy!

Friday 2 September 2011

Holidays are (almost) coming...

So this is my first blog and it is very apt that it is also Christmas related; as those of you who know me will understand my love for all things festive!

Today I have spent hours in the kitchen (literally!) making Christmas cake and mincemeat well in advance for Christmas.
I spent a while deciding which recipe to follow and in the ended settled with good old Delia's Classic Christmas Cake - with a few Dani modifications!

Don't be put off by the amount of time and preparation required - as I've discovered today, it really is worth the effort and I now have enough mincemeat to make mince pies in abundance throughout December and probably months after!


I'll post up the recipes for both in case anyone would also like to be super organised and impress their families with their homemade wares;


Traditional Christmas Cake


450g Currants
175g Sultanas
175g Raisins
50g Glacé Cherries (rinsed, dried and finely chopped)
50g Mixed Candied Peel (finely chopped)
3 Tablespoons of Brandy
225g Plain Flour
1/2 Teaspoon Salt
1/4 Teaspoon Freshly Grated Nutmeg
1/2 Teaspoon Ground Mixed Spice
225g Unsalted Butter
225g Soft Brown Sugar
4 Large Eggs
50g Chopped Mixed Nuts
25g Ground Almonds
1 Dessertspoon Black Treacle
Grated zest of 1 lemon
Grated zest of 1 orange

Firstly, you will need to do some preparation the night before you wish to make the cake - place all of the dried fruit and peel into a large bowl, mix the brandy evenly through and cover with a clean tea-cloth and leave the fruit to absorb the brandy for about 12 hours.

The next day, pre-heat the oven to gas mark 140 (Celsius).

Measure out all of the ingredients (and tick them off to make sure you don't forget any!).

Sift the flour, salt and spices into a large bowl and lift the sieve up high to give the flour a good airing.

In a separate mixing bowl cream together the butter and sugar until it's light, pale and fluffy.

Crack the eggs in to a small bowl and beat them together - then add them to the creamed mixture a tablespoonful at a time and keep the whisk going until all of the egg is incorporated - this should prevent the mixture from curdling, but don't worry if it does!!

When all of the egg has been added, fold in the flour and spices using folding movements to keep all of the air in. Next, fold in the fruit, peel, chopped nuts and treacle - and finally add the grated lemon and orange zests.

Add the mixture to a prepared tin (lined with greaseproof paper) and cover the top of the cake with a double layer of greaseproof paper with a hole about the size of a 50p coin in the middle.

Bake the cake on the lowest shelf of the oven for about 4 and a half hours - it can take a little longer.

Cool the cake for 30 minutes in the tin, then put it on a wire rack to cool fully. When it is cold 'feed' it with some more brandy by poking some holes in it and pouring over a few more tablespoons. Wrap it in clingfilm and foil and place it in an airtight container - you can feed it every couple of weeks in the run up to Christmas so it will be rich and moist by the time it's ready to be devoured!

I'll post up some decorating ideas in the run up to Christmas, as it won't need decorating until about a week or two before you're going to eat it.

When it's finished it should look something like this;


Homemade Mincemeat

If you are making a Christmas cake then you will have most of the things required to make mincemeat, so I would have a whole day of Christmas prep - and the gorgeous smell filling the house will be an extra bonus!

To make the mincemeat, you will need;

450g Bramley Apples (or normal apples if you can't find Bramley in the supermarkets) cored and chopped small, no need to peel.
225g Shredded Suet
350g Raisins
225g Sultanas
225g Currants
225g Whole Mixed Candied Peel, finely chopped
350g Soft Dark Brown Sugar
Grated Zest and Juice of 2 Oranges
Grated Zest and Juice of 2 Lemons
50g Chopped Mixed Nuts
4 Teaspoons Mixed Ground Spice
1/2 Teaspoon Ground Cinnamon
Grated Nutmeg
6 Tablespoons Brandy.

This is dead simple to make! Combine all of the above ingredients, except for the brandy, in a large mixing bowl, stirring them thoroughly. Cover it with a clean cloth and leave the mixture in a cool place overnight, so the flavours really mingle and develop.

Pre-heat the oven to 120 (Celsius), cover the bowl loosely with foil and pop it in the over for 3 hours.

The suet will have melted and the mincemeat will be swimming in fat - but don't worry! As the mixture cools, stir it from time to time and the fat will coagulate and cover all of the ingredients. When the mincemeat is quite cold, stir in the brandy.

To store you can either sterilise some jars and store them, or I've just popped my mincemeat in to some lock and lock containers that are airtight. Keep them in a cool, dark cupboard.

For a veggy alternative, you can use vegetarian suet.

Once again, in the run up to Christmas I'm going to experiment using the mincemeat in different ways so I will post up the recipes and pictures then.